Faders Window
The Faders Window is only available with SCS Professional and higher license levels.
EQ settings are only available with Live Inputs, which requires the use of SoundMan-Server.
Overview
The Faders Window provides conventional fader controls for your input gains, output gains and the master output level. Adjusting gains is possible using your mouse on these controls, but live adjustments are much easier if you have an external 'Control Surface' such as a Behringer BCR2000 or BCF2000, or a Korg nanoKONTROL2. In the External 'Control Surface' Setup topic of this Help you will see how you can link your Control Surface to SCS, although currently the only external devices supported are the Behringer BCR2000, BCF2000, and the Korg nanoKONTROL2
However, you can also control the Output Gain, Master and DMX faders by MIDI Cue Control messages.
|
Note that all EQ settings and all fader levels are stored in the production's Device Map file, so are computer-specific. |
Access the Faders Window by clicking the Show Faders button below the VU meters in the main window. When you click this button, a window like this will be displayed:
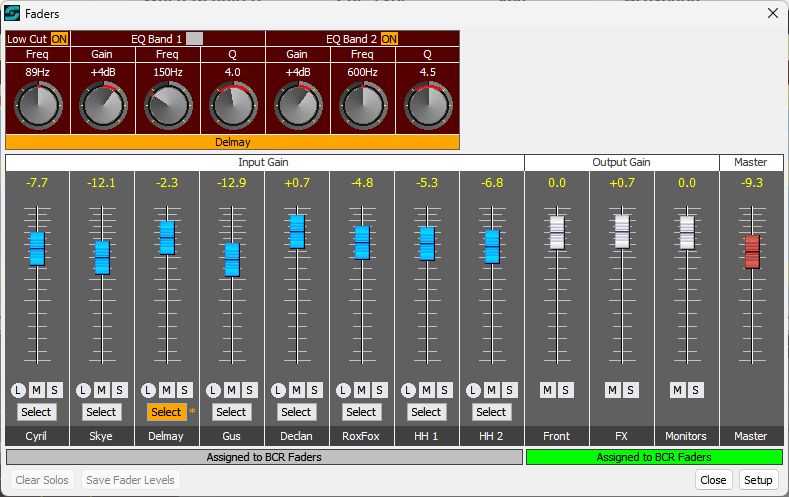
This example is based on a production that has eight live inputs and three audio output 'devices'. The first six live inputs are fed from radio mics on six actors, and the last two live inputs are a fed from hand-held radio mics.
You can drag the window to wherever you want, and SCS will remember the position between sessions.
Controls and Fields
EQ Controls
EQ is only available on live inputs, so the EQ panel is only displayed if you have at least one live input. EQ is available on every live input channel, but the EQ panel just shows the EQ settings for whichever channel has the Select button highlighted. In the above example, this is Delmay. BCR2000/BCF2000 tip: To Select a live input channel for EQ control, press the 'EQ Select Live Input' button on the BCR2000 or BCF2000 for that live input channel. (See External 'Control Surface' Setup for more information.)
|
You must Select a live input channel before you can adjust any of the following EQ controls. The EQ controls will show whatever EQ settings you last set for that live input channel. |
Low Cut: To apply the low-cut filter, click the ON button next to 'Low Cut'. (Click the button again to deselect.) You can then adjust the roll-off frequency by using your mouse to 'turn' the Freq knob, similar to an ordinary fader, ie click-and-move.
The low cut Frequency may be set between 20Hz and 400Hz. The default is 100Hz.
BCR2000/BCF2000 tip: Turn Low Cut on or off by pressing the first push encoder, and adjust the frequency by turning the first push encoder.
EQ Band 1: Two bands of parametric EQ are available, so details regarding EQ Band 1 also apply to EQ Band 2. The only difference between the two bands is the default frequency. To apply EQ Band 1, click the ON button next to 'EQ Band 1'. (Click the button again to deselect.) You can now adjust the Gain, Frequency and Q of the EQ band.
The Gain range is -15dB to +15dB, default 0dB.
The Frequency range is 20Hz to 20000Hz. The default frequency for EQ Band 1 is150Hz and the default frequency for EQ Band 2 is 600Hz.
The Q value determines the bandwidth around the selected Frequency - the higher the Q value the narrower the bandwidth. The supported range from wide to narrow is Q 1.0 (about 1.4 octaves) to Q 20.0 (about 0.7 octaves). The red marker on the control shows if you are widening or narrowing the bandwidth. The default Q value is 4.0 (about 1/3 octave).
BCR2000/BCF2000 tip: The 2nd-4th push encoders control the gain, frequency and Q for EQ Band 1, and the 5th-7th push encoders control the corresponding settings for EQ Band 2. Press any one of these push encoders to turn on or off the respective EQ Band group, and turn the encoders to adjust the values.
Faders
Faders are displayed for live input channels (if any), for audio output 'devices', and for the master audio output control.
If a DMX lighting device is specified, then the DMX Master fader is also displayed and also faders for up to 8 dimmer channels (dimmer channel settings only available with the nanoKONTROL2).
Please note that the live input and audio output faders control the gain (input gain or output gain) of those channels - they do not show or control levels set within cues. For example, using the above screenshot, if you lower the level of the 'Front' output then that will lower the 'Front' level for all cues that send output to that device. Similarly, if you increase the level of 'Cyril' then that affects all cues for Cyril.
Assign/Assigned to BCF Faders: These two buttons below the fader groups are only displayed for the BCF2000 as the BCF2000 has only 8 vertical faders, so these buttons enable you to designate the assignment of the vertical faders. You can either click one of these buttons, or press the corresponding Inputs or Outputs button on the BCF2000 (see External 'Control Surface' Setup for more information).
Faders: Click and drag a fader to adjust the level. The maximum level for audio faders will be either 0dB or +12dB, according to the Maximum Audio Level set in Run Time Settings. If you hold down a Ctrl key and click a fader, the level will be set to 0dB. The DMX Master fader range is 0% to 100%. Adjusting the DMX Master fader only affects the DMX values sent to 'dimmable' channels - see Lighting Devices.
|
Note that keyboard shortcuts are available for increasing and decreasing the Master level and the DMX Master percentage. These keyboard shortcuts operate whether or not the Faders window is currently displayed. |
BCR2000 tip: Fader levels can be adjusted using the respective rotary encoders. Note that the DMX Master fader is mapped to the 8th rotary encoder in the top row.
BCF2000 tip: Live Input fader levels can be adjusted by assigning the faders to Inputs and then using the respective vertical faders. Outputs and Master fader levels can be adjusted by assigning the faders to Outputs and then using the respective vertical faders. As with the BCR2000, the DMX Master fader is mapped to the 8th rotary encoder in the top row.
nanoKONTOLR2 tip: When using 'Preset C' the 'Level' faders control the device levels only for the first currently-playing audio file sub-cue. That sub-cue number will be displayed above the faders, eg 'Q27<2> Level'. If there is no currently-playing audio file sub-cue then these level faders will be disabled an the dB setting will be displayed as 'X'. This also applies to any devices not used by the first currently-playing audio file sub-cue.
L (Live) indicator: This is a display-only indicator. If the Live indicator is highlighted yellow (as shown above for Cyril, Skye, Delmay and Declan), this means a Live Input Cue for this input is 'live'. So the above example is for a scene or part-scene in which these four characters are on stage and have speaking parts. All other inputs are not live, so any audio coming from those non-live mics will not be heard through SCS.
M (Mute) and S (Solo) buttons: These are traditional Mute and Solo buttons, intended for use during testing and tech runs etc. If a Mute button is pressed then it is highlighted in red and that input is muted. If a Solo button is pressed then it is highlighted in green. Solo causes only the soloed channel(s) to be heard through SCS. Note that multiple channels may be either muted or soloed.
Select: As mentioned earlier, Select is used to select the live input channel for EQ.
Other Buttons
Clear Solos: This button is enabled if at least one Solo button is selected. Since you may have several Solo buttons selected, using Clear Solos is a convenient way to cancel all selected Solos.
Save Fader Levels: Since faders are designed to provide live control of input and output gains (particularly input gains), SCS does not assume you always want to save these settings. So if you adjust fader levels and later on close SCS, then SCS will not ask you if you want to save your changes. So if you do want to save the latest fader levels, click Save Fader Levels. (This button is only enabled if at least one fader level has been changed.)
Close: Closes this window.
Setup: This button opens the External 'Control Surface' Setup window. You must have a MIDI Cue Control Device set up for this button to be enabled, even if that device has no 'Cue Control Commands' assigned. Relevant 'Cue Control Commands' will, however, need to be assigned if you are not using an external controller such as the BCR2000, but are using incoming MIDI messages to control the Output Gain, Master or DMX faders.