Lighting Control by External Fader
This feature is only supported under SCS Professional and higher license levels.
Overview
Setting a cue's Activation Method to External Fader enables you to manually control the fade of that cue's Lighting sub-cue(s). For example, if you have a nanoKONTROL or a Behringer BCF2000 or BCR2000 MIDI Controller then you can use the faders to control individual Lighting cues in SCS. To use this feature you will need a MIDI controller that will send MIDI Control Change messages on moving a fader.
Implementation
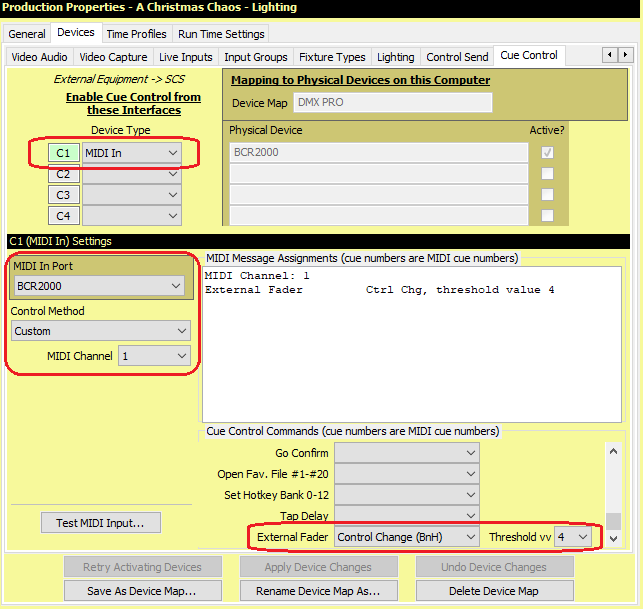
In Production Properties in SCS, set up a Cue Control device similar to that shown below:
The MIDI Channel must match that used by your controller in MIDI Control Change messages sent on moving a fader.
Set External Fader to Control Change.
Note that no Control Change number (cc) is entered here. That will be entered in the Cue Properties for cues with 'External Fader' as the Activation Method. Each such cue should have a unique Control Change number, so it can be controlled by the corresponding fader on your MIDI controller.
We recommend you set the Threshold vv (threshold value) to a value greater than 0. When an external fader is moved, this will trigger and control the relevant cue (if set). The 'threshold value' is to help avoid accidental starting of a cue if a fader is bumped or very slightly moved. In this above screenshot the threshold has been set to 4. What this means is that if the fader is bumped and sends a MIDI Control Change value of, say, 1, then SCS will ignore this message. SCS would only take action if the MIDI control change value is 4 or greater. You can set the threshold value to any value from 0 to 9. If you set this to 0 then any increase of the fader, including value 1, will activate the cue. SCS will calculate the required percentage based on the range from the threshold value up to 127.
A Lighting Cue to be controlled by an external fader should be set up similar to this example:
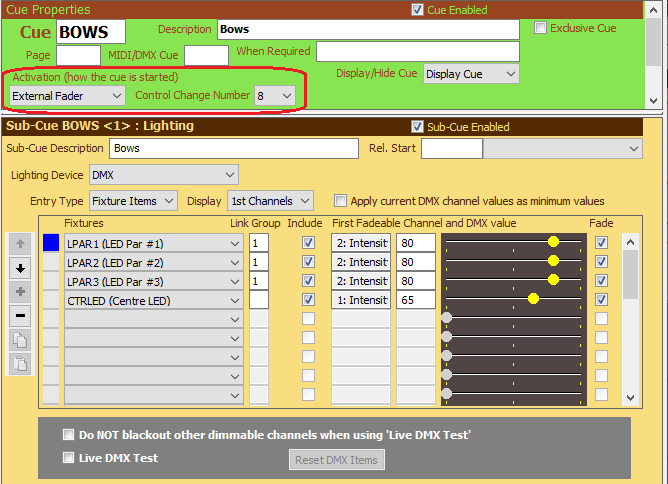
The Activation Method must be set to 'External Fader', and the Control Change Number must be set to match that sent by your MIDI controller on moving the fader you want to use for this cue.
If a fixture's dimmer channel set to, say, 80%, then the fader's 0%-100% range will be applied against 0%-80% for that DMX channel. If the dimmer channel of another fixture in that same cue is set to 100% then the fader's 0%-100% will be applied against the full 0%-100% range of that fixture.
Note that the 'fade up', 'fade down' and 'fade out others' times in an 'external fader' lighting cue are hidden and therefore ignored, as the action of the external fader is effectively replacing these fade times.
|
Important: SCS assumes the cue's relevant fader will initially be at the minimum position. When the fader level reaches the 'Threshold Value' ('Threshold vv') then the cue state will change to Playing and DMX values will be calculated and applied. The cue state will remain at Playing until the fader level returns to minimum (MIDI value 0). When this occurs, the cue state will return to Ready. |
Apply current DMX channel values as minimum values: If you leave this checkbox clear then when this cue is activated (by moving the fader at least as far as the threshold position) then each nominated fixture will be faded up from 0. So if, for example, LPAR2 in the above screenshot is currently displaying at 50% then on activating the cue that fixture will immediately change to 0% and then increase as the fader is raised. This is OK if you always expect to use this feature shortly after a blackout. However, if you select this checkbox then as you raise the fader then the level of LPAR2 will stay at 50% until the fader itself sends Control Change values greater than 64 (ie 50%). Similarly, on lowering the fader from, say, maximum, then LPAR2's level will drop accordingly until it reaches 50% and will then stay at 50%.
Credit: Thanks to Michel Winogradoff and Didier Petit for advice on and assistance with the design and testing of this feature.