Playlist Cues
Playlist Cues are only available with SCS Standard and higher license levels.
Overview
Playlists are designed for pre-show and intermission music, but there is no reason why you cannot use them for any cue or sub-cue that requires this functionality. A typical playlist for pre-show or intermission music will contain several audio files, with more than enough music to cover the pre-show or intermission time. With a playlist you can play the tracks (ie files) in the playlist for as long as you need to, and then when the show is about to start or re-commence after intermission, you activate an SFR cue to fade out the playlist wherever it is up to.
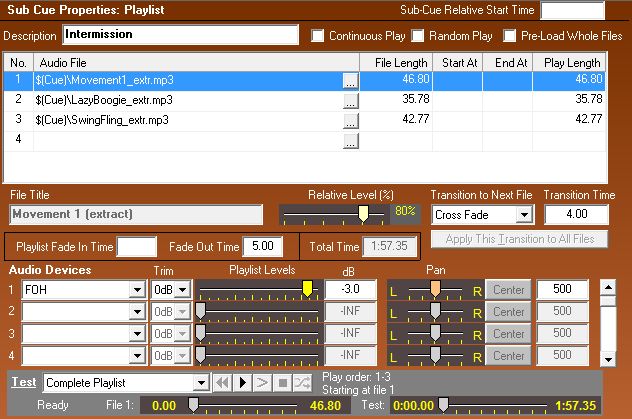
For a Playlist cue or sub-cue, the lower panel to the right of the cue list tree will contain properties specifically for playlist sub-cues. For example:
Properties and Controls
General
Sub-Cue Relative Start Time: This field is available for every type of sub-cue. Click here to see the description of this field under Audio File Cues. Then click the Back button in the Help Viewer to return to this page.
Description: Enter a description for this sub-cue.
Continuous Play: Tick this checkbox if you want the playlist to loop back to the start when it reaches the end.
Random Play: Tick this checkbox if you want random play of your playlist. The random order of play is set when the cue file is loaded, or whenever you re-tick this checkbox, or whenever the shuffle button in the transport controls is clicked.
Pre-Load Whole Files: By default, SCS plays audio files by decoding and streaming the data from disk while the file is being played. Normally this is OK, but if you find the playback breaks up, especially if you are using ASIO, then it may be beneficial to pre-load the whole file into memory. This can be requested using this checkbox. ASIO outputs are particularly susceptible to audio break-ups if the sound card's ASIO driver only permits a small buffer size. See the Troubleshooting topic ASIO Problems for more information.
Files pre-loaded into memory can take up a lot of memory, so SCS ignores the flag if the duration of the audio file is more than 6 minutes. This applies even if you select only a shorter portion of the file to play. The memory taken up by a pre-loaded file is freed when the file is closed, unless that same file is also used in a later Audio File cue or in a hot key Audio File cue.
Audio Tracks
This table contains the audio files to be included in the playlist. They are referred to as 'tracks', so a playlist with 8 audio files contains 8 tracks.
Audio File: This will contain the path name of an audio file to be played. The ... (browse) button can be used to locate a required file.
If you try to open a WMA file that has DRM (Digital Rights Management) protection then SCS may not be able to open it - you may get the error message: 'The file is protected (license required)'.
You can also 'drag-and-drop' one or more audio files into this field from another program such as Windows Explorer.
To change the order of the tracks you can click on the 'Audio File' field of the track you want to move, and drag it to the required position.
To remove a track, right-click the track you want to remove and select Remove File from Playlist from the pop-up menu.
To rename a track, right-click the track you want to rename and select Rename File from the pop-up menu. This will open the Rename File window.
File Length: This display-only field shows the duration of the audio file.
Start At and End At: If you do not want to start the track from the beginning of the file, enter the time at which the track is to start. This can be to 2 decimal places of seconds. For example, enter 12.5 to start the track 12.5 seconds from the start of the file. Leave blank to start at the beginning of the file.
If you want SCS to stop the track before the end of the file then enter the time at which you want the track to stop. This is the absolute time within the file, not the required time after 'Start At'. Leave 'End At' blank to let the track run until the end of the file (or until you stop it). For example, to get SCS to stop playing the track at the 15.45 seconds time with the file enter 15.45 in the 'End At' field.
Play Length: This display-only field shows how much of the audio file will be played, based on the 'Start At' and 'End At' where set. The range of the progress slider for this track is set to the Play Length.
File Title: When you open an audio file SCS will examine the file and display the title if found, Otherwise SCS will display a title derived from the file name.
Relative Level (%): As different audio files can be recorded at different levels, this fader gives you a chance to adjust the level of an individual track, making it louder or softer than the others. The default setting for this fader is 80%, so by default you have headroom available for increasing the level of a track.
Transition to Next File: This defines how the playlist is to go from this track to the next track in the playlist. Options are
· None: No 'transition' is required, and that when this track has completed the next track will start, with no cross-fade, etc.
· Cross Fade: This track will fade out and the next track will simultaneously fade in. The duration of the cross-fade is specified in the Transition Time field.
· Mix: This is like a cross-fade in that the next track will commence before this track has ended, but the tracks will not be faded out or in. This is suitable for music tracks that have their own fade-out. The duration of the mix is specified in the Transition Time field.
· Wait: This provides for a pause between tracks. A CD player will normally provide a 2-second or more pause between tracks, and this 'Wait' transition type enables you to emulate this in a playlist. The duration of the wait is specified in the Transition Time field.
Apply This Transition to All Files: The information you have just entered sets the transition between this track and the next track. If you have significantly different start and end characteristics i the various tracks you have selected for your playlist, you may want to individually set the transitions for each track. However, if you want to use the same transition for all tracks then having set a transition type and time, click this button. The button is disabled if all the transition types and times are already the same. It is recommended that you do use the same transition type and time for all tracks, especially if you use random play.
Transition to Next File, Transition Time and Apply This Transition to All Files: These fields indicate how the playlist is to go from this track to the track.
Playlist Fade In Time: Enter the time in seconds (eg 3.5) that you want the playlist to fade in with. Leave blank if no fade in of the playlist is required. This fade in time is also used when resuming a hibernated playlist unless the SFR cue that activates the resume has a 'fade time override' set..
Fade Out Time: Enter the time in seconds (eg 3.5) that you want the playlist to fade out over when an SFR cue is activated to fade out this playlist cue. The cue will be marked as 'completed' when the Playlist Fade-Out has ended, and any unplayed files in the Playlist will be discarded, unless the SFR cue specifies hibernate, in which case the playlist cue will be marked as 'hibernated' and any unplayed files in the Playlist will still be available when the Playlist is resumed.
Total Time of Playlist: This display-only field shows the total time of the playlist, allowing for cross-fade time etc to avoid double-counting.
Audio Devices
In this section you will define which audio devices are to used by this playlist. It may be that you are just using a single mono or stereo output, in which case you will only need a single entry in this section. However, with SCS Professional you can nominate up to four audio devices per playlist sub-cue, and with SCS Professional Plus you can use up to eight audio devices.
Audio device: The audio devices available are as specified in the Production Properties.
Trim: You should only need to use this control if your playlist is to be played at a low level and you are having difficulty setting the level using the Playlist Levels control. With the Trim control you can apply an overall reduction in the level of up to 50dB.
Playlist Levels: The level fader sets the level (volume) at which SCS will play the cue. The setting of the fader is also displayed and is enterable as a dB value. The maximum dB setting (loudest) setting is 0dB, which represents the level of the audio file as recorded, ie without any attenuation. If you set the level to -75 or lower then SCS treats this as -infinity, ie silent. You may also enter this as -INF.
Pan: The pan controller sets the stereo position of the sound. The setting of the controller is also displayed and is enterable as a number, where 0 is left, 500 is center, and 999 is right. The Center button is enabled if the current value is not 500 (center). Clicking this button sets pan to 500 (center).
|
Testing your Playlist Cue You can test your Playlist Cue using the controls available in the 'Test' panel. As a playlist can typically run for 20 minutes or more, SCS provides a way for you to check the transitions without having to listen to the entire 20 minutes or so. In the drop-down box next to 'Test' you can choose how much of the playlist you want to test. You can select Complete Playlist, First and last 10 seconds of each track, First and last 5 seconds of each track, or the Highlighted file only. If you select Complete Playlist or one of the First and last ... seconds... tests, then the test will start at the currently selected file. This is shown by the wording below the Play order. Use the multimedia controls to play or stop the test. The 'File' slider in the Test panel shows the progress through the file currently being played, and the 'Test' slider shows the progress thru the test as a whole. You cannot currently drag these sliders yourself. |